According to PassportIndex.org below are the countries that Filipinos can visit using the Philippines passport only, and there is no need to apply for any visas. However, always bear in mind that even if the country is visa free for us, it is still up to the border police whether or not to allow a visitor for tourism.
Continue reading “The Visa Free Countries that Filipinos can Visit with their Philippines Passport Only”Countries that Filipinos can visit with a Philippine passport and a Schengen visa Type C
My name is Natalia, and I possess only one citizenship. I hold a Philippines-issued regular (non-diplomatic) passport for international travel, and I previously held a multiple-entry Schengen visa Type C. Using this visa, I could visit the 29 Schengen member countries for tourism.
Which countries are inside the Schengen Area?
As of this writing, the 29 Schengen countries are the following (I placed a check mark next to every country I had been to.):
Austria √
Belgium √
Continue reading “Countries that Filipinos can visit with a Philippine passport and a Schengen visa Type C”How to get a Turkey E-visa for Filipinos holding a Philippines Passport
This article is for Filipinos or citizens of the Philippines holding a Philippine passport with a multiple-entry Schengen visa (type C) and wanting to apply for a Turkish E-visa.
I will share how I processed the Turkey E-visa for Filipinos and my experience during the border crossing during my previous visit to Istanbul, Turkey.
Last February 2024, I obtained a one-year multiple-entry Schengen visa (type C). The Schengen visa was valid for one year until March 2025. Around August 2024, I applied for the single-entry Turkey E-visa online, and here were the steps I’ve been through:
Continue reading “How to get a Turkey E-visa for Filipinos holding a Philippines Passport”One-Year Multiple Entry Schengen Visa (Type C) for Filipinos with Philippines Passport
My name is Natalia, I am a citizen of the Philippines. I possess only one citizenship and a Philippines-issued regular (non-diplomatic) passport for international travel. However, I have a permanent residence in Ukraine.
In this article, I will share with you how I obtained my first ever multiple-entry Schengen Visa via the Consulate of Hungary, located in Berehove, Ukraine. This was a Type C multiple entry visa which was valid for one year, and allowed me to visit the Schengen member countries for up to 90 days. This application was submitted directly to the consulate.
Let’s review what is a Schengen Visa. This visa allows Filipinos and other Nationals from third countries to enter the Schengen Area or a zone comprising 29 countries in Europe.
Continue reading “One-Year Multiple Entry Schengen Visa (Type C) for Filipinos with Philippines Passport”How to Create a Youtube Channel Using Your Desktop 2022
So, you already have an existing gmail email address and created a Youtube account. This tutorial is about how to create additional Youtube channels under one Youtube account.
Step 1. Login to your Youtube account.
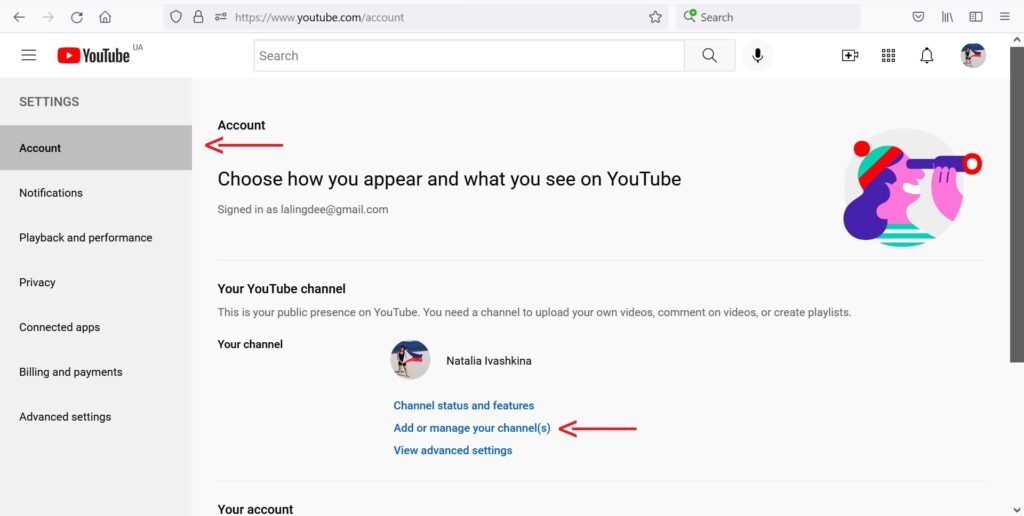
Step 2. Click your profile icon located on the upper right corner. A menu appears, click Settings.
Step 3. Click Account tab on the left hand side menu. Click Add or manage your channel(s).
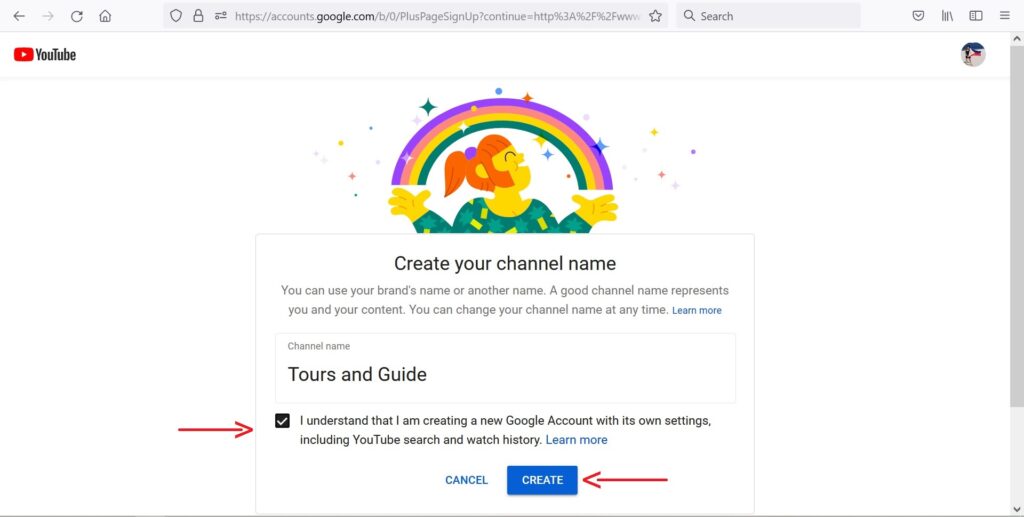
Step 4. Click CREATE A CHANNEL button.
Step 5. Enter your desired channel name. Click the check box in front of “I understand that I am creating a new Google Account…” Click CREATE button.
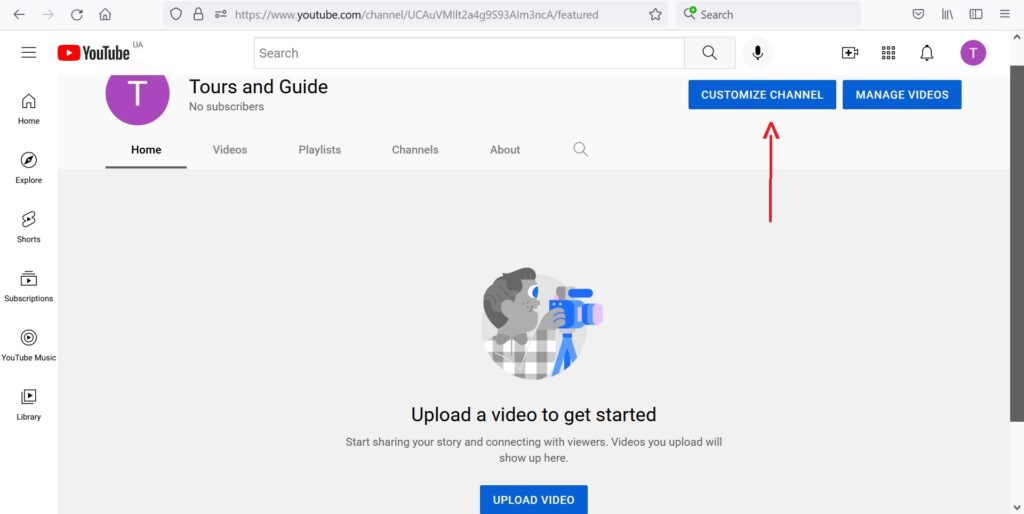
You will be redirected to a page to customize further your new Youtube channel or upload your first video.
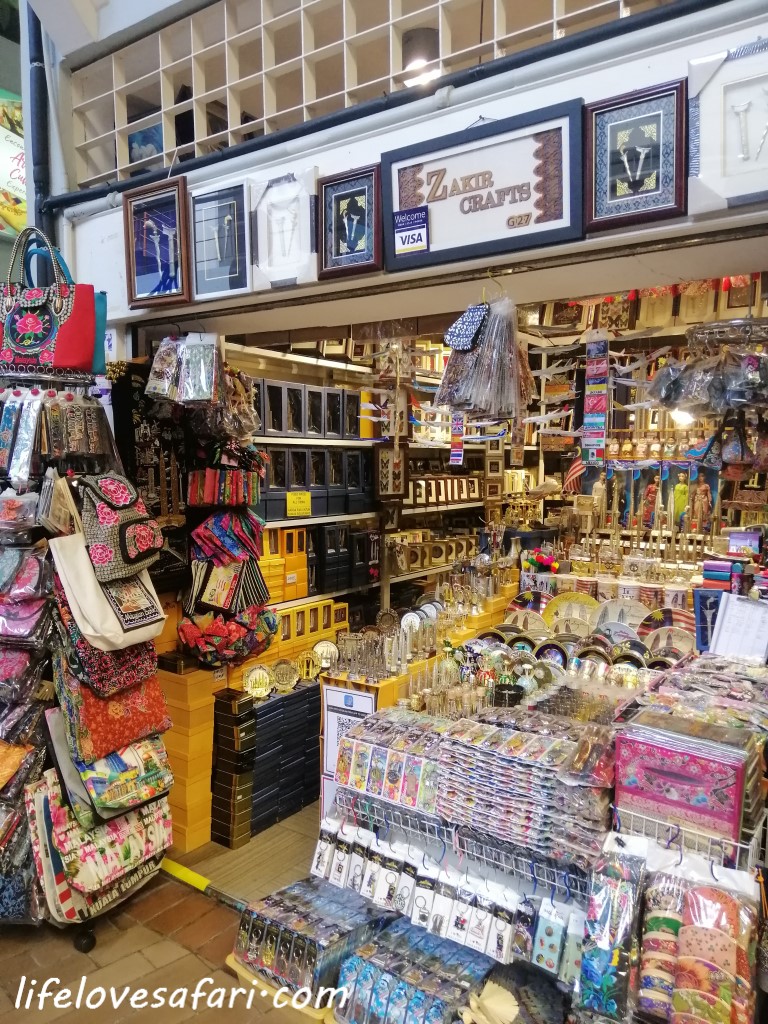
Places to visit in Kuala Lumpur, Malaysia’s China Town
The top places I recommend that you visit whenever you are in China town in Kuala Lumpur are namely Petaling Street Flea Market, the Hindu temple Sri Maha Mariamman, Guan Di Temple (also known as Kuan Ti temple or Kwong Siew temple), Central Market, and Sin Sze Si Ya Temple. I briefly described each of these places below:
Petaling Street Flea Market
It is a pedestrian shopping flea market with multi-racial sellers or hawkers. In this market, you can buy clothes, souvenirs, class A bags, watches, clothes, flowers, fruits, and many more. There are also various restaurants serving Chinese cuisines.
Sri Maha Mariamman Temple
This Hindu temple was originally a private shrine established in 1873 by a Tamil Indian family who originated from southern India. The five-tiered entrance gate of the temple is decorated with intricate carvings of Hindu deities.
Guan Di Temple Chinatown or Kwong Siew Temple
Guan Di Temple was built in 1888. It is one of the oldest temples in Kuala Lumpur’s China Town. Presently the temple is housed inside the premises of Kwong Siew Association located on Tun H.S.Lee Street. The association was built by Chinese people from Guangzhao Province who came to Malaysia a long time ago. Today, Guan Di Temple remains to be a crucial center where Chinese Malaysians celebrate festivals, remember their ancestors, practice their beliefs and continue to educate the next generation.
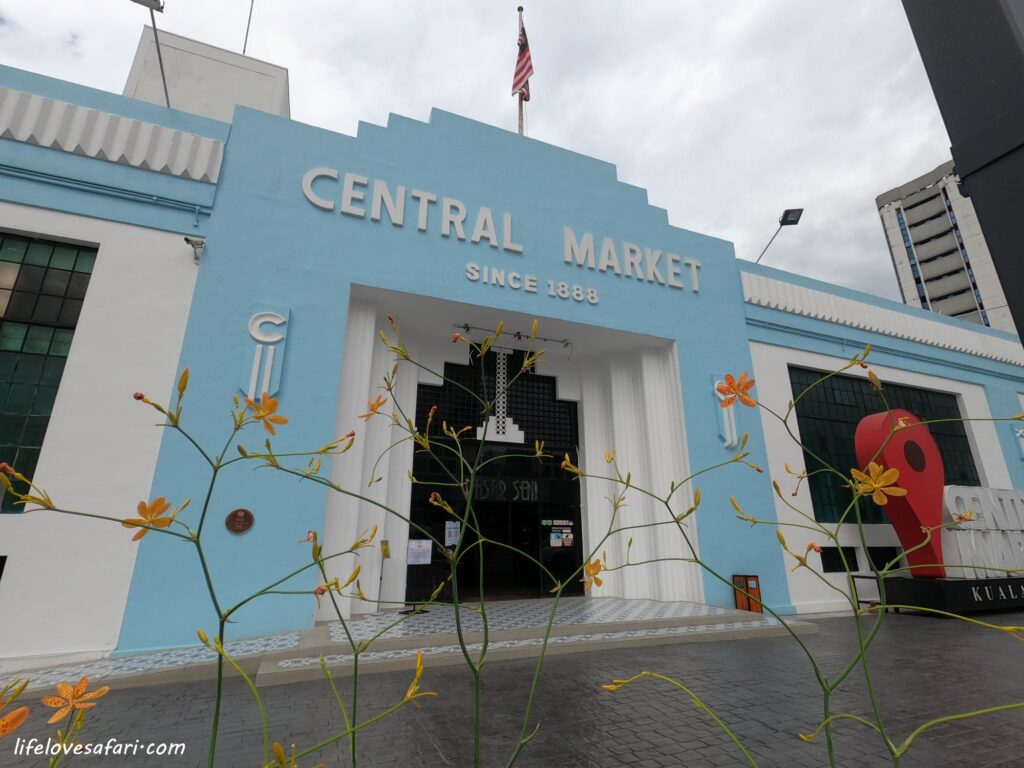
Central Market
This market was originally a location for selling fresh produce. The Central Market art deco building we see presently dates back to the 1930s. During the 1980s Central Market was transformed into a shopping complex and today tourists visit this market to buy all sorts of souvenirs such as traditional clothes, batik, modern souvenirs, pewter products, paintings, and many more. Visitors can also dine at restaurants serving Indian, Malaysia, and Chinese cuisines and during festivities, there are cultural presentations being held on the market’s stage.
Sin Sze Si Ya Temple
Sin Sze Si Ya Temple was built in 1864. It is the oldest temple in Kuala Lumpur’s China Town. It is also located on Tun H.S.Lee Street. This temple dedicated to two deities (Sin Sze Ya and Si Sze Ya) was built on the instructions of Yap Ah Loy, an immigrant from Kwangtung Province, China who later became one of the founders of Kuala Lumpur.
Paypal Ukraine Account for Foreigners
Paypal has expanded its services in Ukraine recently. In this post, I will share my PayPal experience from account creation to sending money from Paypal Ukraine to Paypal Philippines.
Foreigners residing in Ukraine can sign for Paypal Ukraine. One must have a Ukrainian mobile number, a Ukrainian bank account and an International passport.
Sign Up for Paypal Ukraine
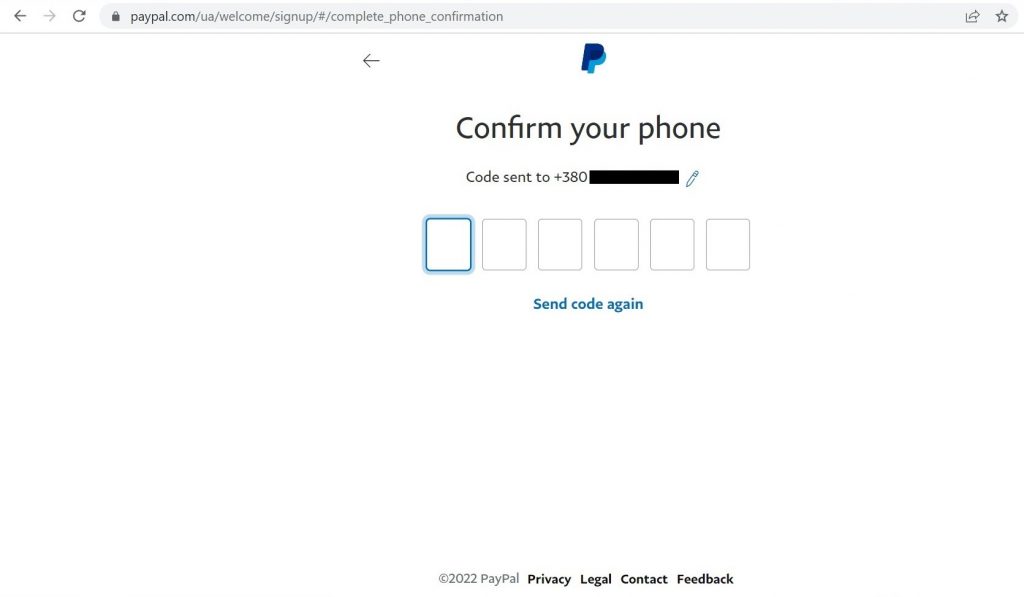
Step 1. Visit Paypal Ukraine’s website. Click Sign Up and enter your Ukrainian mobile number. A code will be sent and it must be entered into the page to continue the signup process.
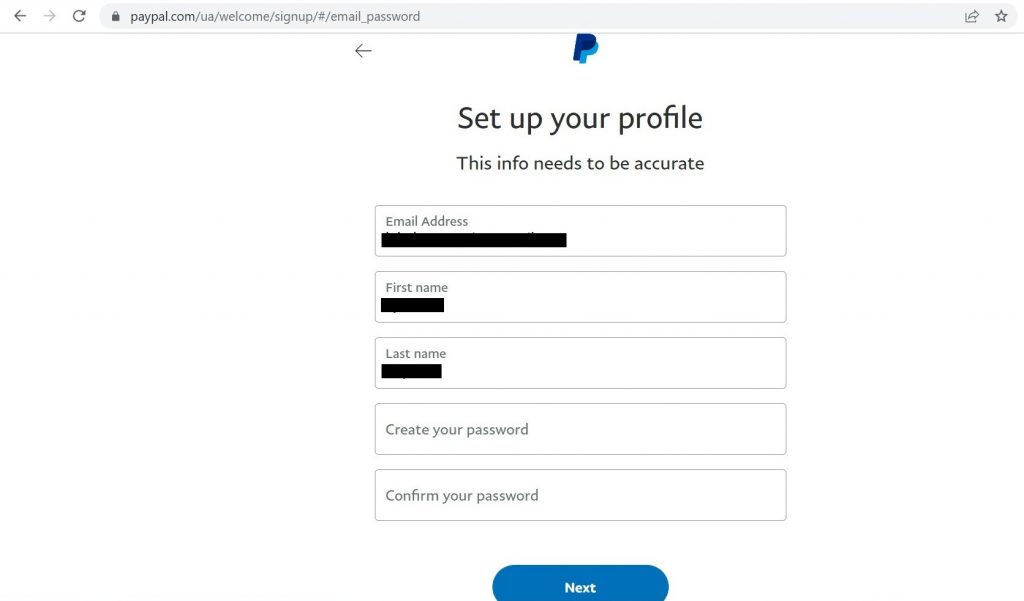
Step 2. Enter your email address, first name, last name, a very strong password, and click the Next button to proceed.
Step 3. Enter your Nationality, birth date, and complete address in Ukraine. You should be able to verify the address in the future. PayPal might ask you to submit supporting documents such as utility bills that show the same address you entered in your Paypal Ukraine account. After that, read and agree to Paypal’s terms and conditions, and you are registered!

Step 4. Once you are in, you need to verify the email address connected to your Paypal Ukraine account. Just open your inbox and click the link in the email sent by Paypal to you.
Verify your Paypal Ukraine Identity
To further verify my account I uploaded my Philippines international passport. Hence, you can also upload your passport if you are a foreigner residing in Ukraine.
Link a Ukrainian Bank Account to your Paypal Ukraine
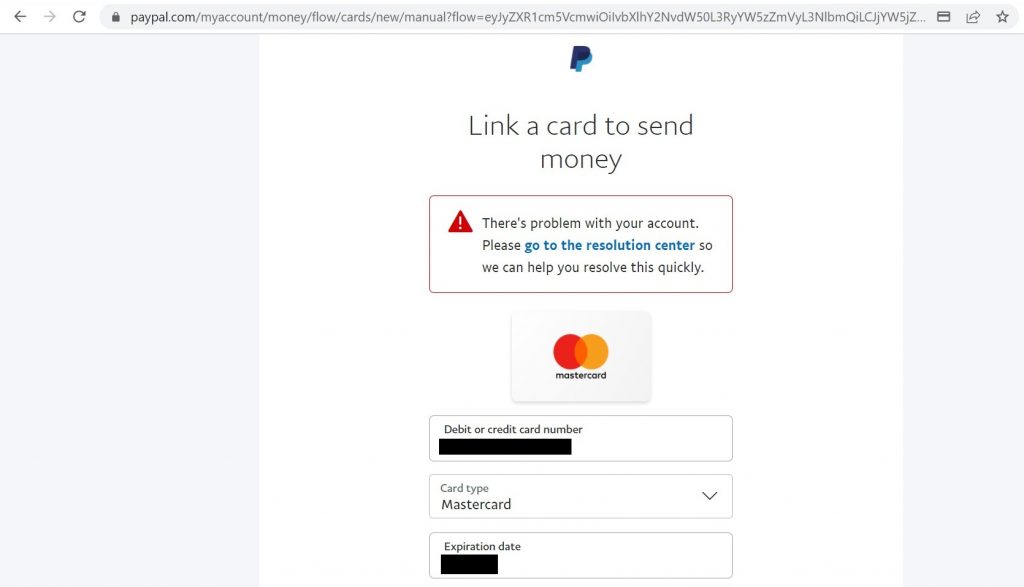
You must just log in to your Paypal Ukraine account and go to the Wallet section and click on Link Card. On the next page, you need to enter debit or credit card number, card type, card expiration date, security code, card’s billing address, and click Link Card.
I tried to link my Credit Agricole, Bank Aval Raiffeisen and Privat Bank cards and none of them works. I kept getting an error message “There’s a problem with your account. Please go to the resolution center so we can help you resolve this quickly.” Hence, I messaged Paypal Ukraine through the resolution center and informed them about my card linking problem. Paypal support was quick and they got ahold of me. There was a verification through the phone. The agent asked for my name and last name and also the last four digits of the card I tried to link to my Paypal Ukraine account. Then she asked me to log out from my account and log in again. She did something on her end and asked me to add again my card. I tried to add my Credit Agricole card but it did not work for the second time. Hence, I tried again my Bank Aval Raiffeisen card and it worked. There are Ukrainian debit or credit cards that do not work with Paypal Ukraine.
Confirm the Ukrainian Card Linked to Paypal Ukraine
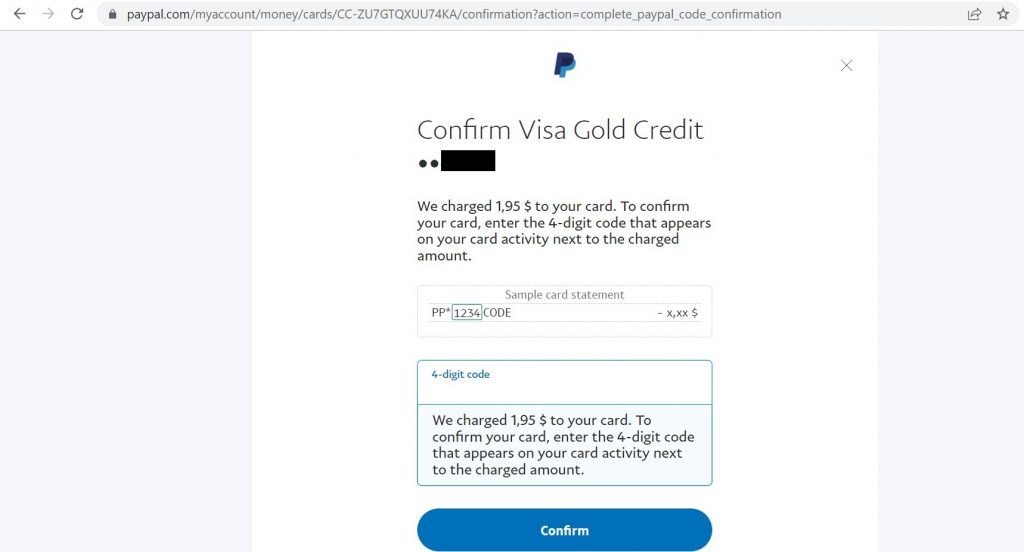
You must just log in to your Paypal Ukraine account and go to the Wallet section. Click the card you want to confirm and click Confirm card. A special code will reflect in the debit or credit card electronic bank statement This code must be entered into the card verification page to complete the process. Just note that some amount will be charged to generate the code but it will be returned.
Sending Money from Paypal Ukraine to Paypal Philippines
You must just log in to your Paypal Ukraine account and go to the Send section to send money.
I tried sending money from my Paypal Ukraine to a Paypal Philippines account. First, I entered the Paypal Philippines email address of the receiver and then the amount. There is no need to fund your Paypal Ukraine account as the money will be taken directly from the linked Ukrainian debit or credit card. I tried to send 5 USD and the fee was 4.68 USD. You can check the Paypal Ukraine Fees page for more information. In the example below, the receiver in the Philippines received exactly 5 USD. I actually asked the receiver to refund the money as it was for testing purposes only. Once the money was refunded, logically it got credited back to the linked Ukrainian debit or credit card.

These were my recent experience with using Paypal Ukraine. As of this writing, it is now possible to receive money in Paypal Ukraine wallet and be able to withdraw the money to the linked Ukrainian debit or credit card.
Google Adsense Account Verification for Content Creators in Ukraine
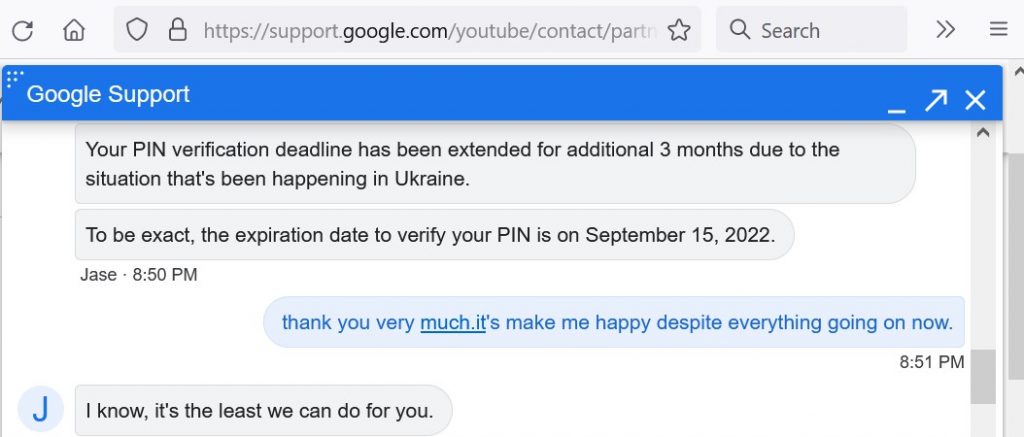
I have been living in Ukraine since the last quarter of the year 2021. I had to close my old Google Adsense account and open a new one with an address in Ukraine. However, on February 24, 2022, Russia invaded Ukraine. My family and I had to leave our home in central Ukraine. My Google Adsense earning had reached the 10 USD threshold to be able to receive a Google verification code. Once the code is issued, it is very important to verify the Google Adsense account as soon as possible in order for the monetization to continue.
How to verify your Google Adsense account if you fled Ukraine due to war?
There is a quote “If you never try, you will never know.” Hence, you should just ask Google Adsense Support Team to give you an exception. There is an option to chat with a support agent or send them a message through the feedback form. Based on my personal experience using Google’s chat support, they considered my reason as valid and gave me a six months extension to verify my Google Adsense account.
How to Transfer Mexico Visa from Old to New Passport
I am a citizen of the Philippines who is a permanent resident in Ukraine. I was granted a 10 years multiple entry visa in 2019 by the Embassy of Mexico in Ukraine. Embassies are busy this week relocating their citizens due to a possible Russian invasion according to the USA intel. Hence, I decided to just email the Mexican Embassy and here was their reply:
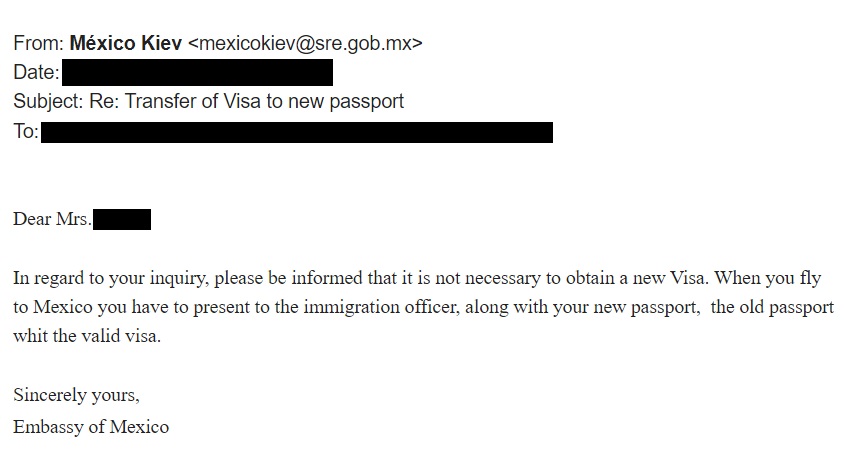
Hence, as long as the Mexico multiple entry visa is valid, there is no need to transfer it to the new Philippines Passport. You must just present your old passport with a valid Mexico visa and your new passport to the Mexico immigration control at the country’s arrival area.
How to Get a Tax Identification Number (TIN) for Foreigners in Ukraine
As a foreigner in Ukraine, I need to get a tax identification number (TIN) if I want to open a bank account in Ukraine. My name is Natalia, I am a citizen of the Philippines and I am a permanent resident in Ukraine. My permanent residence permit was granted based on marriage to a citizen of Ukraine. In this post, I will share my experience in getting TIN in Kyiv, Ukraine.
Requirements to Get a Tax Identification Number in Ukraine
- Temporary or Permanent Residence Permit ID Card.
- Certificate of Registration of Residence or in Ukrainian, it is called “Довідка про реєстрацію місця проживання особи.”
Note: Both documents need to be photocopied.
Where to get the Tax Identification Number in Ukraine
My husband and I went to the nearest tax department office based on the address stated in my Certificate of Registration of Residence. In Ukrainian, a tax department’s office is called “Державна податкова инспекция.” We arrived at the office and there was a local receptionist who helped us print the service priority number based on our purpose of visit which was to secure a TIN. Our priority number was called and we were directed to enter a specific room number. In the room, a lady met us and gave us a form to fill in. In Ukrainian, the form is called “Форма № 1др” or “Облікова картка фізичної особи – платника податків.” I asked my husband to fill in the form for me. He wrote my name in Ukrainian and English language and all the rest were written in Ukrainian.
I gave the filled-in form back to the lady. She told us to come back after five working days.
It takes five working days to process a TIN in Ukraine
My husband and I came back to the tax department’s office. As usual, the receptionist helped us get a service priority number to collect the TIN. Our priority number was called and we were directed to enter a specific room number. In the room, a lady greeted us and gave us a book to sign my name and signature. After that, she gave me a piece of paper that shows my Ukrainian Tax Identification Number and that’s it.